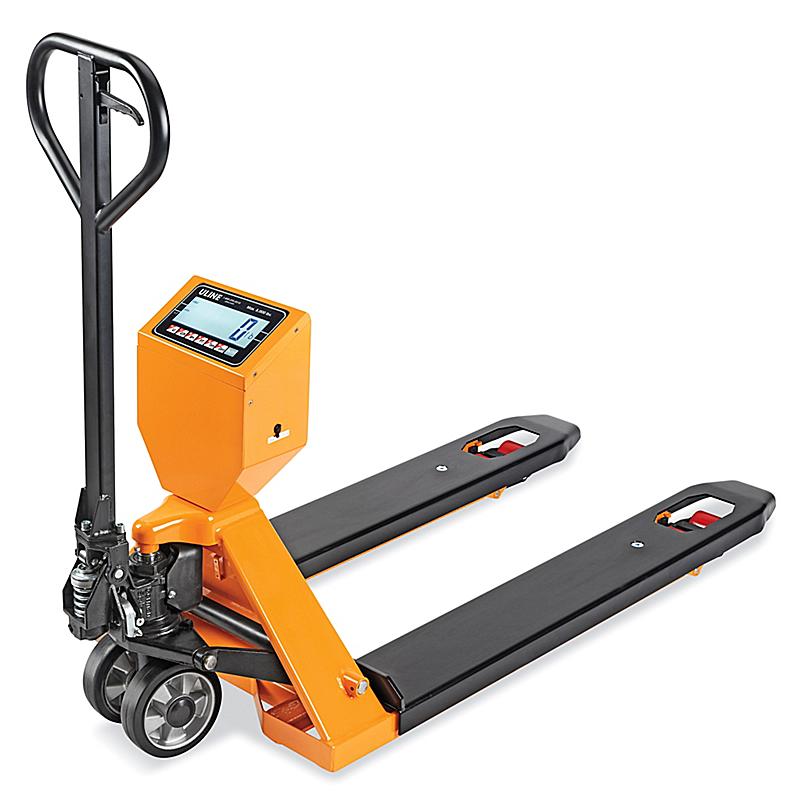
H-1679 Pallet Truck Scale
A practical, offline manual for daily use: weigh pallets, tare containers, accumulate multiple weights, troubleshoot common errors, maintain the battery, and find key replacement parts without rummaging through four PDFs like a civilization that has given up.
Dashboard
What matters before someone drags this 370 lb argument with wheels across the warehouse.
Capacity
5,000 lb
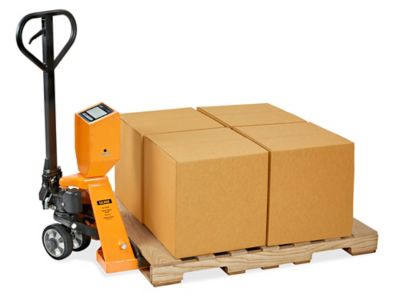
Do not overload. Load must be evenly distributed and centered around the halfway point of the forks.
Fork geometry
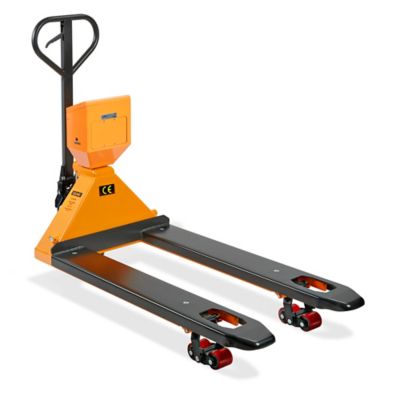
48" length
27" overall width
7" individual width
Display
5½-digit LCD with 2" digits, white LED backlight, stable/zero/net/unit indicators.
Power
6V/10Ah built-in rechargeable lead-acid battery with 12V/500mA AC adapter.
Daily pre-use checklist
Fast correct weighing
Set the lever to LOWER, lower the truck fully, then turn the scale on and wait for zero.
Match fork length to the pallet and keep the load balanced as evenly as practical.
Set lever to ASCENT and pump. Wait for the stable indicator before recording weight.
Zero the empty pallet or tare a container/skid so the displayed value is the product net weight.
Detailed specifications (from Uline)
| Specification | Value |
|---|---|
| Model | H-1679 |
| Fork size | 48 x 27" (Standard) |
| Capacity / Accuracy | 5,000 lb x 1 lb |
| Minimum weight | 20 lb |
| Overall length | 64.2" |
| Fork width (actual) | 27.09" |
| Distance between forks (inside) | 12.91" |
| Fork height | 3 1/3" lowered, 7 1/2" raised |
| Fork thickness | 2 1/4" overall (black portion: 1 7/8") |
| Steering wheel | 7 x 2" diameter x width |
| Steering arc | 220 degrees |
| Display | 2" LCD, white LED backlight |
| Units | LB / KG / OZ convertible |
| Battery | 6V/10Ah lead-acid, rechargeable, included |
| Battery life | Up to 60 hours operation |
| Recharge time | 15 hours |
| AC adapter | Input 100-240V, 50/60Hz; Output 12V/500mA |
| AC adapter cord length | 6' |
| Unit weight | 370 lb (shipping: 375 lb) |
| Shipping | Unassembled, motor freight |
| Warranty | Limited 1 Year |
| Compliance | Not NTEP, Measurement Canada, or Legal for Trade |
| Wheels | Steering: rubber tread, plastic hub. Load: polyurethane tread, cast iron hub |
Setup and assembly
Unpack, attach the control panel, install handle, verify lift/lower function, and charge before first real use.
Control panel attachment
Do not pull or pinch the cable.
Align the three control panel holes with the three holes on the truck base.
Remove the two side screws, align mounting holes, and keep cable slack safe.
Tighten through the base of the control panel with the provided hex wrench.
Reinstall the two side screws.
Handle installation
Locate the crank link set screw before inserting the handle.
This lets you connect the chain/pin correctly.
Route it through the center of the base and axle.
Tighten securely with the supplied hex wrench.
Raise the crank link and slide the pin into its groove.
Raise/lower verification
| Symptom during setup | Set screw adjustment | Verify after adjustment |
|---|---|---|
| Forks elevate while pumping in NEUTRAL. | Turn set screw clockwise until pumping no longer raises forks. | Re-check NEUTRAL and LOWER. |
| Forks descend while pumping in NEUTRAL. | Turn set screw counter-clockwise until forks no longer descend. | Re-check NEUTRAL and ASCENT. |
| Forks do not descend in LOWER. | Turn set screw clockwise until forks lower. | Confirm lower position works without load. |
| Forks do not elevate in ASCENT. | Turn set screw counter-clockwise until forks elevate while pumping. | Re-check NEUTRAL and LOWER after the fix. |
Operation
Normal weighing, tare, gross/net, accumulation, pretare, and unit settings.
Control lever
| LOWER | Push lever up to lower forks. |
|---|---|
| NEUTRAL | Move the load without raising/lowering. |
| ASCENT | Push lever down and pump handle to raise forks. |
Keypad
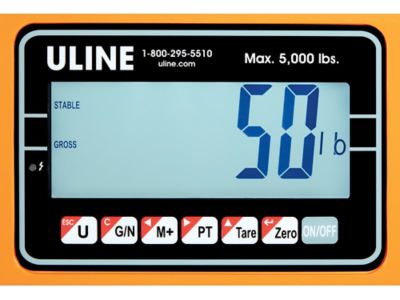
| ON/OFF | Power. |
|---|---|
| ZERO | Zero display; enter in settings. |
| TARE | Deduct container/pallet weight; increment value in settings. |
| PT | Manual/preset tare; move digit right in settings. |
| M+ | Accumulate weight; move digit left in settings. |
| G/N | Toggle gross/net after tare; clear in some modes. |
| U | Select units or escape settings. |
Zero and tare
Use ZERO when the empty pallet/forks should read zero. Use TARE when a pallet/container weight must be deducted. Press TARE again to leave NET mode.
Accumulation workflow
Remove weight from forks and press ZERO before using accumulation.
Wait for stable, then press M+. Display shows AC 01 and the memory total briefly.
Remove the load, let the scale return to zero, then weigh the next item.
Changing units during accumulation clears memory.
Press M+ at zero to view total. Press G/N while total is shown to clear memory.
Pretare workflow
The current tare value appears.
Use TARE to select desired pretare item.
Use M+/PT to move digits and TARE to change value, then press ZERO to store.
Use G/N to make sure NET mode is active, press PT, pick slot, then ZERO to display pretare value.
Function settings
| Function | What it controls | Choices / default |
|---|---|---|
| F1 unit | Displayed weight unit | kg / lb |
| F3 bK | Backlight | On, Auto, Off. Default: Auto. |
| off | Auto power off | 0, 3, 5, 15, or 30 minutes. Default shown as 0. |
Troubleshooting wizard
Pick the displayed error or behavior. The manual then shows the least theatrical next move.
Choose symptom
Safe diagnostic order
- Remove load and inspect obvious damage, wheel obstruction, wet display, or loose fork cover.
- Power-cycle, then zero with empty forks on flat, dry ground.
- Charge battery fully if the battery symbol appears or runtime is poor.
- For hydraulic behavior, adjust the crank-link set screw and re-check all three lever positions.
- For persistent weight errors, recalibrate using 10% capacity weight, which is 500 lb for this model.
- Persistent Err 6 may indicate load cell or electronics fault, so stop improvising before the machine writes a tragedy.
Error code table
| Error / issue | Likely cause | Resolution |
|---|---|---|
| ----- | Overload | Remove weight. If persistent, contact Uline. |
| Err 4 | Scale outside normal zero setting range at power-on or when ZERO was pressed. | Remove weight and retry. Use TARE to set display to zero. Contact Uline if persistent. |
| Err 6 | A/D converter values outside normal range; overloaded, missing/loose fork cover, possible load cell/electronics fault. | Remove overload, ensure fork cover plate is attached. Contact Uline if persistent. |
| Inaccurate or will not weigh | Scale may be out of calibration. | Recalibrate using the instructions section. |
Maintenance and battery
Keep it dry, charged, lubricated, and not treated like a sacrificial warehouse goat.
Battery rules
- Battery life is approximately 60 hours under the manual's stated conditions.
- Low battery symbol means charge soon; the scale may operate about 30 more minutes before auto shutoff.
- Full operating charge is listed as about 15 hours.
- Fully charge before first use and at least monthly to maintain performance.
- Use original battery and AC adapter. AC adapter rating is 12V.
- Charge near room temperature; avoid battery exposure below 14°F (-10°C) or above 113°F (45°C).
Daily maintenance
Battery replacement summary
Take off the battery cover.
Disconnect red and black terminals first, then pull battery from housing.
Reconnect terminals correctly and secure the cover.
The maintenance section lists 12 hours after replacement for full capacity; the operation section lists 15 hours for full operating charge. To be conservative, use 15 hours when time allows.
SLA battery safety quick notes
- Internal battery materials can be corrosive if the case is opened or leaking.
- For internal material skin/eye exposure, flush with running water for more than 20 minutes and seek medical help.
- Keep batteries away from ignition sources, heat, flame, polarity reversal, overcharge, and short circuits.
- Store cool, dry, and well ventilated; keep packed to prevent movement and short circuits.
Maintenance log
Parts lookup
Search common H-1679 parts by part name, diagram number, Uline part number, or manufacturer part number.
| # | Description | Qty | Uline part no. | Mfg part no. | Assembly |
|---|
Frequently purchased parts
| Part No. | Description |
|---|---|
| H-1679-ADAPT | AC Adapter |
| H-1679-BATT | Battery (6V/10Ah SLA) |
| H-1679-STWHL | Steering Wheel (7 x 2") |
| H-1679-MNBRD | Mainboard |
| H-5255 | Load Roller Kit |
| H-6020 | Junction Box |
| H-7897 | Protection Panel |
| H-6682 | Lowering Valve Kit |
Order at uline.com or call 1-800-295-5510.
High-value service parts
Frame Load Cell: H-1679-LCELL, qty 4. Load cell shim qty 4. Cover plate assembly differs by model.
Pump Pump Assembly: H-1679-PUMP, mfg HP-ASSY-AH. Lowering Valve Kit: H-6682.
Handle Handle Assembly Kit: H-1679-HANDL. Wire, Chain and Pin: H-1679-CHAIN.
Parts note
The parts diagram labels several entries as for ordering replacement parts only. Use the diagram number and both part-number columns when calling Uline, because apparently one identifier was too merciful.
Calculators
Quick tools for net weight, unit conversion, accumulation, and calibration planning.
Net weight calculator
Use when recording pallet/container tare manually rather than using the scale's TARE function.
Unit converter
The instructions list lb/kg selection on the U key; this calculator includes oz because your toolbox entry includes LB/KG/OZ convertibility.
Accumulation calculator
Calibration helper
Capacity is 5,000 lb. The instructions state calibration must use 10% of capacity, so the target calibration load is:
Use stable, known calibration weight. Do not use mystery pallets, forklifts, or vibes.
Document index and source notes
This interactive manual is a condensed field guide derived from the uploaded documents and your supplied toolbox entry.
Uploaded documents
| Doc | Use |
|---|---|
| IH-1679 instructions | Specs, setup, safety, operation, battery, maintenance, calibration. |
| TH-1679 troubleshooting | Error codes and operating-issue remedies. |
| PH-1679 parts diagram | Exploded diagrams and ordering part lists. |
| SH-1649 SLA battery SDS | Battery hazard, first aid, handling, storage, and PPE information. |
Original product link
List price: $1,995. Ships unassembled via motor freight. Not air-shippable. Cannot ship to Alaska, Puerto Rico, or US Virgin Islands.
Toolbox caveats carried over
- Status: verify the exact unit and configuration before use.
- Ships unassembled by motor freight.
- Not air-shippable.
- Not NTEP / Measurement Canada / legal-for-trade.
What this manual intentionally does not do
It does not replace the OEM instructions, SDS, legal calibration/certification requirements, or Uline service guidance. It is a working, interactive reference built from the attached docs so the useful parts are not buried like treasure in a PDF swamp.
Related Videos
External YouTube resources that complement this manual. Videos remain the property of their respective creators.
Uline Pallet Trucks
Uline (official) — 244K views
Official Uline product demonstration showing pallet truck operation and features.
How to Use a Manual Pallet Jack Truck
Uline (official) — 274K views
Official Uline how-to guide for operating a manual pallet jack — covers basic operation shown in our Setup section.
These are external resources from YouTube, not produced by BLK19 AI. Provided as supplementary reference only.